Pages

Wednesday, February 25, 2015

FOTD: Stila Eyeshadow, Laura Mercier Foundation...

Here's an old post I had already written (over a year ago!) but never posted...not sure why. Enjoy - and hope to see you all again real soon.

You ever have those days where you just mess around with some makeup? I was rummaging through my ridiculously large collection of eyeshadows and decided to have a little sesh with my stila shades. I used to use them all of the time, but they haven't been getting a lot of love lately. I had picked up a few new shades when stila was having a warehouse sale a while ago, and (gasp!) I hadn't used them yet. I had no real plan, but here is what I came up with.


 {Eyes}
MAC Nubile paint pot
stila shadows:
  oasis - lid, inner corner
  rain - crease
  toffee - above crease, lower lash line
  kitten - highlight
  mahogany - outer corner, crease, outer corner of lower lash line
  terracotta - lightly to warm up transition from crease to brow highlight
Bobbi Brown gel liner - Caviar Ink - upper lash line, tightline
Rimmel Scandaleyes 005 Nude - water line
tarte Lights Camera Flashes Statement Mascara

 {Face}
Laura Mercier Silk Creme Foundation - Cream Ivory
tarte Amazonian Clay Full Covefrage Concealer - Light
tarte brow architect
MAC MSFN - light plus
Too Faced Chocolate Soleil Matte Bronzer
MAC - Melba
MAC MSF - Lightscapade

{Lips}
Revlon Lip Butter - Wild Watermelon


Pretty average eye look, but these shades are so beautiful. Still just as wonderful as I remembered!

What have you been in to lately?
Becca

Sunday, June 16, 2013

How I Wear: bareMinerals "The Possibilities"

My laptop crashed (well, it works, but it has to be plugged in at all times) and even though we have a desktop, I just slacked in writing another post. You see, I need the portability of the laptop so I can keep up with the three toddlers trashing my house. I have a very busy little boy, and another one in the works. No unsupervised time is advised.

Anywho...next up in the series is the understated "The Possibilities." When I saw this quad as part of their December TSV for QVC, I wasn't thrilled. It was the other shades offered in the auto-delivery plan that got me to take the plunge. When I received my Beautifully Brilliant kit in the mail, I was pleasantly surprised to see the READY 4.0 quad in person. (This isn't important, but I loved everything else in the kit as well...hello, READY Liner Shadow!) As far as I know, this quad was exclusive to this kit from QVC - I'm not sure if it will be available as a single product purchase from the boutique or another retailer at some point in the future.
Promise, Future, Destiny, Sign

Promise, Future, Destiny, Sign

Promise, Future, Destiny, Sign
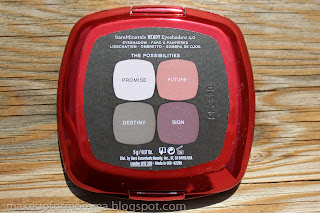
bareMinerals The Possibilities, clockwise from top left: Promise, Future, Destiny, Sign
The shades are muted, but quite beautiful when applied. Online, the shades are described as:
  • Promise: a creamy beige
  • Future: a sunset pink
  • Destiny: a warm gray matte
  • Sign: a smoky purple haze
Promise, Future, Destiny, Sign
bareMinerals The Possibilities, L-R: Promise, Future, Destiny, Sign
Promise, Future, Destiny, Sign
bareMinerals The Possibilites, L-R: Promise, Future, Destiny, Sign
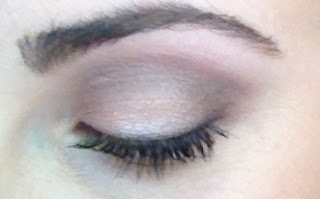
I have read mixed reviews on this particular combination of shades. I've found that after applying them a few different times, I really do like what they've included. I think my favorite so far has been, Future all over the lid, Destiny on the outer corner and through the crease, Sign blended into the outer corner, lower lash line and deep into the socket, and Promise as a brow and inner corner highlight.


{Face}
It Cosmetics IT-O2 Oxygen Anti-Aging Liquid Foundation - Light
tarte Amazonian Clay Full Coverage Concealer - Light
bareMinerals Blush - perfect rose
bareMinerals Mineral Veil - perfect light
bareMinerals brow powder - dark blonde medium brown

{Eyes}
bareMinerals prime time
bareMinerals The Possibilities
bareMinerals READY liner - The Horizon duo, Perspective (brown shade)
Mally Volumizing Mascara - Black

Do you have this quad? What are your favorite ways to wear these colors?

Ahhhh, the possibilities ;),
Becca

Monday, April 8, 2013

How I Wear: bareMinerals "The Wild Thing"

Scared. I am scared of wearing bright colors. Why? I don't know, it's just makeup, right? I first fell in love with the packaging of the Remix Trend Collection (out for spring from bareMinerals), and almost bought items for that reason alone. 
Sensational, Icon, Elitist, Controversy

Sensational, Icon, Elitist, Controversy

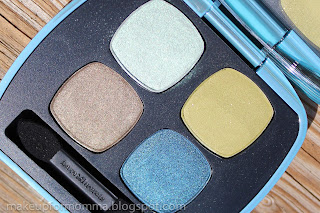
I decided to try The Wild Thing....and I will say that I am not sorry. While it's not a quad I would reach for everyday, it is nice for a change. And the super "scary" colors? Not so scary. I think I've said it before, bareMinerals READY shadows can be sheered out, or built up to the color you see in the pan. It makes these brighter shades more wearable for the color shy.

Online, bareMinerals describes the shades as:
Sensational, Icon, Elitist, Controversy
bareMinerals The Wild Thing, clockwise from top: Sensational, Icon, Controversy, Elitist.
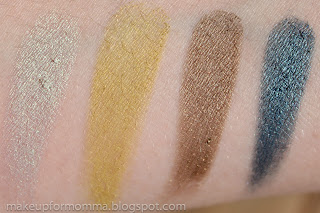
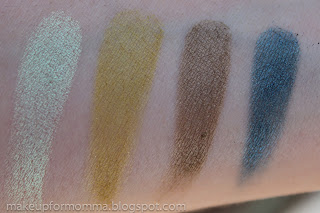
  • Sensational: iridescent aqua
  • Elitist: bronzed taupe
  • Icon: electric chartreuse
  • Controversy: deep marine blue

Sensational, Icon, Elitist, Controversy
bareMinerals The Wild Thing, L-R: Sensational, Icon, Elitist, Controversy
Sensational, Icon, Elitist, Controversy
bareMinerals The Wild Thing, L-R: Sensational, Icon, Elitist, Controversy
This READY 4.0 quad retails for $30 and is sold in stores and online at bareescentuals.com, ulta.com, sephora.com, or anywhere else bareMinerals items may be sold.

Here is how I wore The Wild Thing:
Icon on the lid, Controversy blended onto the outer corner, Elitist in the crease and Sensational as an inner corner and brow highlight. I also smudged Icon, Elitist and Controversy under my lower lashes, in that order, from inner to outer corner. I used a navy colored liner and smudged Controversy over the top.
Sensational, Icon, Elitist, Controversy

Sensational, Icon, Elitist, Controversy

Sensational, Icon, Elitist, Controversy

Sensational, Icon, Elitist, Controversy
I know - such a dork! Trying to have some fun and get a picture without 1 of my 3 toddlers in the background.
Sensational, Icon, Elitist, Controversy

Sensational, Icon, Elitist, Controversy
bareMinerals The Wild Thing, top to bottom: Controversy, Elitist, Icon, Sensational 
Sensational, Icon, Elitist, Controversy
bareMinerals The Wild Thing, clockwise from top left: Icon, Controversy, Elitist, Sensational
Sensational, Icon, Elitist, Controversy

If you were wondering, here is a list of all other products/tools used. I will try to include this for those that wonder what else is on my face. I don't know that I would necessarily pair the bright lip with this eye look, but I wanted to try a new Moxie out. 
Other products used:

{Face}
Smashbox Photo Finish Hydrating Primer
Urban Decay Naked Skin Foundation--3.5
Bobbi Brown Corrector--Light Bisque
Maybelline Instant Age Rewind Eraser Dark Circles Treatment Concealer--Light
theBalm Time Balm Concealer--Lighter Than Light
bareMinerals brow color--dark blonde/medium brown
MAC Mineralize Skinfinish Natural--Light Plus
Too Faced Chocolate Soleil Bronzer--Original Chocolate
MAC Powder Blush--Melba
bareMinerals READY Luminizer--The Love Affair

{Eyes}
bareMinerals Prime Time eyelid primer
bareMinerals READY 4.0--The Wild Thing
Mally Evercolor Ultimate waterproof eyeliner--Navy
Chanel Long Lasting Eyeliner--Ebene
Mally Volumizing Mascara

{Lips}
bareMinerals Marvelous Moxie--Siren

{Brushes}
Sigma:
F80-Flat Kabuki
F75-Concealer
F20-Large Powder
F25-Tapered Face
F10-Powder/Blush
F35-Tapered Highlighter
E55-Eye Shading
E25-Eye Blending
E21-Smudge

Stila:
9

bM:
precision eye
brow

Do you have this quad? Any suggestions on how I should wear it?

Hope you're having a great Monday (if that's possible)....don't forget to check out the 50% off sale on theBalm.com!! I think it goes until 10am PST tomorrow (April 9th).

Here's to the The Wild Thing ;-),
Becca

Thursday, March 21, 2013

How I Wear: bareMinerals "The Truth"

So....leave it to me to start a new series to give myself structure, and then not actually do anything for 2 weeks. Awesome. Well, I do have good reason for not posting sooner, but whatever. I'm here now! 

The first product I'm featuring in this new series is bareMinerals The Truth. I feel like this brand is often overlooked and not given the attention it deserves. Don't get me wrong, there are some amazing die hard fans out there, but generally speaking, whenever I search online for reviews or videos, there aren't always a ton to choose from. 


The Truth is a lovely neutral quad. I find it extremely easy to wear and is one of those that can be used lightly or smoked up a bit for a night out (whatever that is....it's been a while). 

bareMinerals describes these shades as:

  • Serendipitous: delicate peach
  • Magnetism: brushed taupe
  • Fate: light mocha glaze
  • Apropos: twinkling espresso
bareMinerals The Truth: (clockwise) Serendipitous, Magnetism, Fate and Apropos
bareMinerals The Truth: Serendipitous, Magnetism, Fate and Apropos
For an easy go-to look, I like to pat Serendipitous all over the lid and use as a highlight. I place Magnetism through the socket, outer corner and the middle of the lower lash line. Using Fate, I deepen the outer corner and blend along the outer third of the lower lash line. I line my upper lash line with Apropos.

Eye of the Day featuring bareMinerals The Truth READY 4.0 Quad


EOTD


I only got one decent (referring to quality) picture on my "real" camera - and it's this goofy one right here. I tried for several days to wear the quad and remember (or have time) to take pictures. And that would be the reason that all of them are from my iPhone instead. Although the photo quality is not the best, I think you get the idea. Future posts will have better photos, but if I catch a good one on the iPhone, I'm not above using it.

In this last photo, I have on a cream color base from MAC (Take Root), and I've used Serendipitous along the inner third of the lid, Magnetistm on the outer two thirds and blended softly through the crease to meet the highlight (Serendipitous). Then I used a tapered blending brush (E45 from Sigma) and put Fate tightly in the crease and onto the outer corner. Next I used a brown eyeliner smudged into the lash line and topped with Apropros. Lower lash line: Apropos on the outer third, Fate in the middle, Magnetism on the inner third and Serendipitous on the inner corner. Good thing the photo really shows you how I used it. Oh Becca....how helpful am I? Also, this photo was taken about 8 hours after applying it - some of it has rubbed off. I'm one of those that touches my eyes a lot throughout the day.

The READY 4.0 quads from bareMinerals retail for $30 and you can find them in a bareMinerals boutique, Ulta or Sephora, as well as online at bareescentuals.com, ulta.com, sephora.com, qvc.com, or wherever else bareMinerals is sold.

If you have this quad, what is your favorite way to wear it?

Hope you all (yes, all 2 of you), have a wonderful weekend! I'll be doing a bit of judging at a cheer competition. Woohoo!

Becca

Wednesday, March 6, 2013

How I Wear....New Series Explained

I've been toying around with creating a series for this blog for a while. I need to give myself some structure and a sort of schedule to keep the blogging going. I know I'm doing this mostly for myself, but I'm ok with that. Even if only a few people see this, I hope it is helpful.
If you've ever been a stay at home mom, you know how it can get: adult conversations are few and far between, you narrate everything you're doing (Momma has to go potty, Momma's making lunch, Momma needs to do laundry, etc.), you're lucky if you get a shower that day, and you start talking to yourself. A lot. Doing this blog makes me feel like I'm serving a purpose, and instead of talking just to myself, now I get to talk to you.

Maybe it's not that big of a deal for some of you moms...but having twins and then another little guy within such a short time, well, I don't get out much. It's pretty comical to watch me go anywhere, let alone the 30 minutes it takes just to get in the car and leave the house. It started with three kids under 16 months (take a moment to let that sink in, and no, it wasn't on purpose)...now the twins are 3 and the little guy will be 2 in June. I need this...and if you ever switch places with me for 72 hours (any less than that and you won't get the full experience), you'd understand. I thought I knew what it would take to stay home and raise kids - ha. No idea. Not even close. I realize my situation isn't the norm, but still, it isn't an easy thing to do. Ok, enough....


Now, back on topic, the thought process behind this series is to not only show swatches of whatever product is being featured, but to also show it applied. I know there are other well known beauty bloggers who do this (and I love them for it), but I found that I wanted to see even more. If you're like me, you like to read several different reviews and watch a few YouTube videos before purchasing, or even just to gain inspiration for products you already own. I think it was more that I had a hard time finding reviews and pictures of the product applied for certain products (bareMinerals, tarte, Inglot etc.) and so I thought I'd do my own little review, swatches and eye or face of the day pics.


Right now the focus will be on eyeshadow, but I'd love to eventually branch out to other eye, face and lip products. My goal is to feature at least one product per week, but we'll see how it works out - taking and editing photos with little ones around can be quite challenging.

Hopefully this will be helpful, but maybe it'll just be me posing and modeling for myself. Either way, it will make me feel productive and I will have actually used some of the makeup in my collection. All good things, if you ask me.
I'm aware that the looks I come up with won't be groundbreaking - the purpose is really just to show you what they look like on, not necessarily a new way of application. Maybe I'll get adventurous, but I doubt it. My combos will probably be predictable and average - but they may still be helpful. 

I'm starting with the 4.0 quads and 2.0 duos from the READY line of bareMinerals - these are probably the hardest ones for me to find any reviews on. If you have any requests (bareMinerals or not), let me know...if I have the product, I will definitely feature it. Thank you for taking the time to stop by and read my blog!

Momma has to make lunch,
Becca

Monday, February 25, 2013

How To: Depotting MAC Eyeshadows

It took me forever to finally decide that life would still go on if I depotted my precious MAC shadows and put them into one palette. And then, it took me forever to decide what palette they needed to go into. Super important decisions - I'm sure you agree.

Anyway, I watched, what felt like, a million videos on YouTube and read tons of different blogs on this topic. I think I found the easiest, and quickest, way to depot my MAC eye shadows. 

What you'll need:

Towel, Flat Iron, Wax Paper, Something to pop the shadow out, Rubbing Alcohol, cotton balls/pads, magnets, an empty palette.

Pop out the pan of eye shadow from the outer plastic casing. Hang onto this both for the Back to MAC, and so you can remove the label and put it on the back of the eyeshadow pan.

Place your shadow on top of a piece of wax paper sitting on the plate of a hot flat iron.
After about 30 seconds to a minute, remove the shadow and carefully slide a thin tool on the side to pop the pan of shadow out of the inner plastic casing. Careful - the metal pan will be HOT! I usually pop it out onto a towel. If the pan does not budge, place it back on the flat iron. Trying to remove the pan before the glue has softened may result in a cracked shadow. The time will vary, depending on how hot your flat iron gets.


While the metal pan is cooling a little, place the outer casing on the wax paper for about 20-30 seconds. Use the same thin tool to lift the sticker off the back of the casing and place it on the non-adhesive side of your magnet.


Now that the metal pan has cooled enough to handle, use a paper towel, cotton pad or ball soaked in alcohol to rub any adhesive left on the back off. I found this to be the most annoying part of the whole process, but it made for a clean and smooth surface to apply the magnet (that already has the label with the shadow name and finish on it).


Put it into a palette of your choosing :)


Samoa Silk, Soft Brown, Texture, Amber Lights, Swiss Chocolate, Antiqued, Saddle, Rule, Red Brick, Brown Script
MAC shadows L-R, Row 1: Samoa Silk, Soft Brown, Texture, Row 2: Amber Lights, Swiss Chocolate, Antiqued, Saddle, Row 3: Rule, Red Brick, Brown Script.

Let me know if you have any questions. I'd love to know if you have found an even simpler way to do this. I must also add - since I have depotted my shadows, they have received much more use.

Disclaimer: If you decide to depot your shadows, you do it at your own risk. Please use caution - I will not be responsible for any ruined product or physical injury you may sustain.

Now, get to work!
Becca